Audit Profile
- Jenni Wallin
- Philip Yeo
- Yuri Au Yong
There is the possibility to output information to user-defined database tables. This means that several workflows may output information about the same batch to the same table, which makes it possible to trace batches/UDRs between workflows. To increase this traceability, it is highly recommended to add fields to the UDRs, to make it possible to identify their origin. Useful values may be:
Name of the switch
Name of the original file name
Time stamp of the original file
The audit table column types are defined in an Audit profile configuration.
The Audit profile is loaded when you start a workflow that depends on it. Changes to the profile become effective when you restart the workflow.
The Audit profile is used by the Audit tab in the workflow properties, Analysis, and Aggregation agents for Batch workflows. Audit profile is not used in Real-Time workflows.
Configuration
To create a new Audit profile configuration, click the New Configuration button in the Build View, and then select Audit Profile from the selection screen.
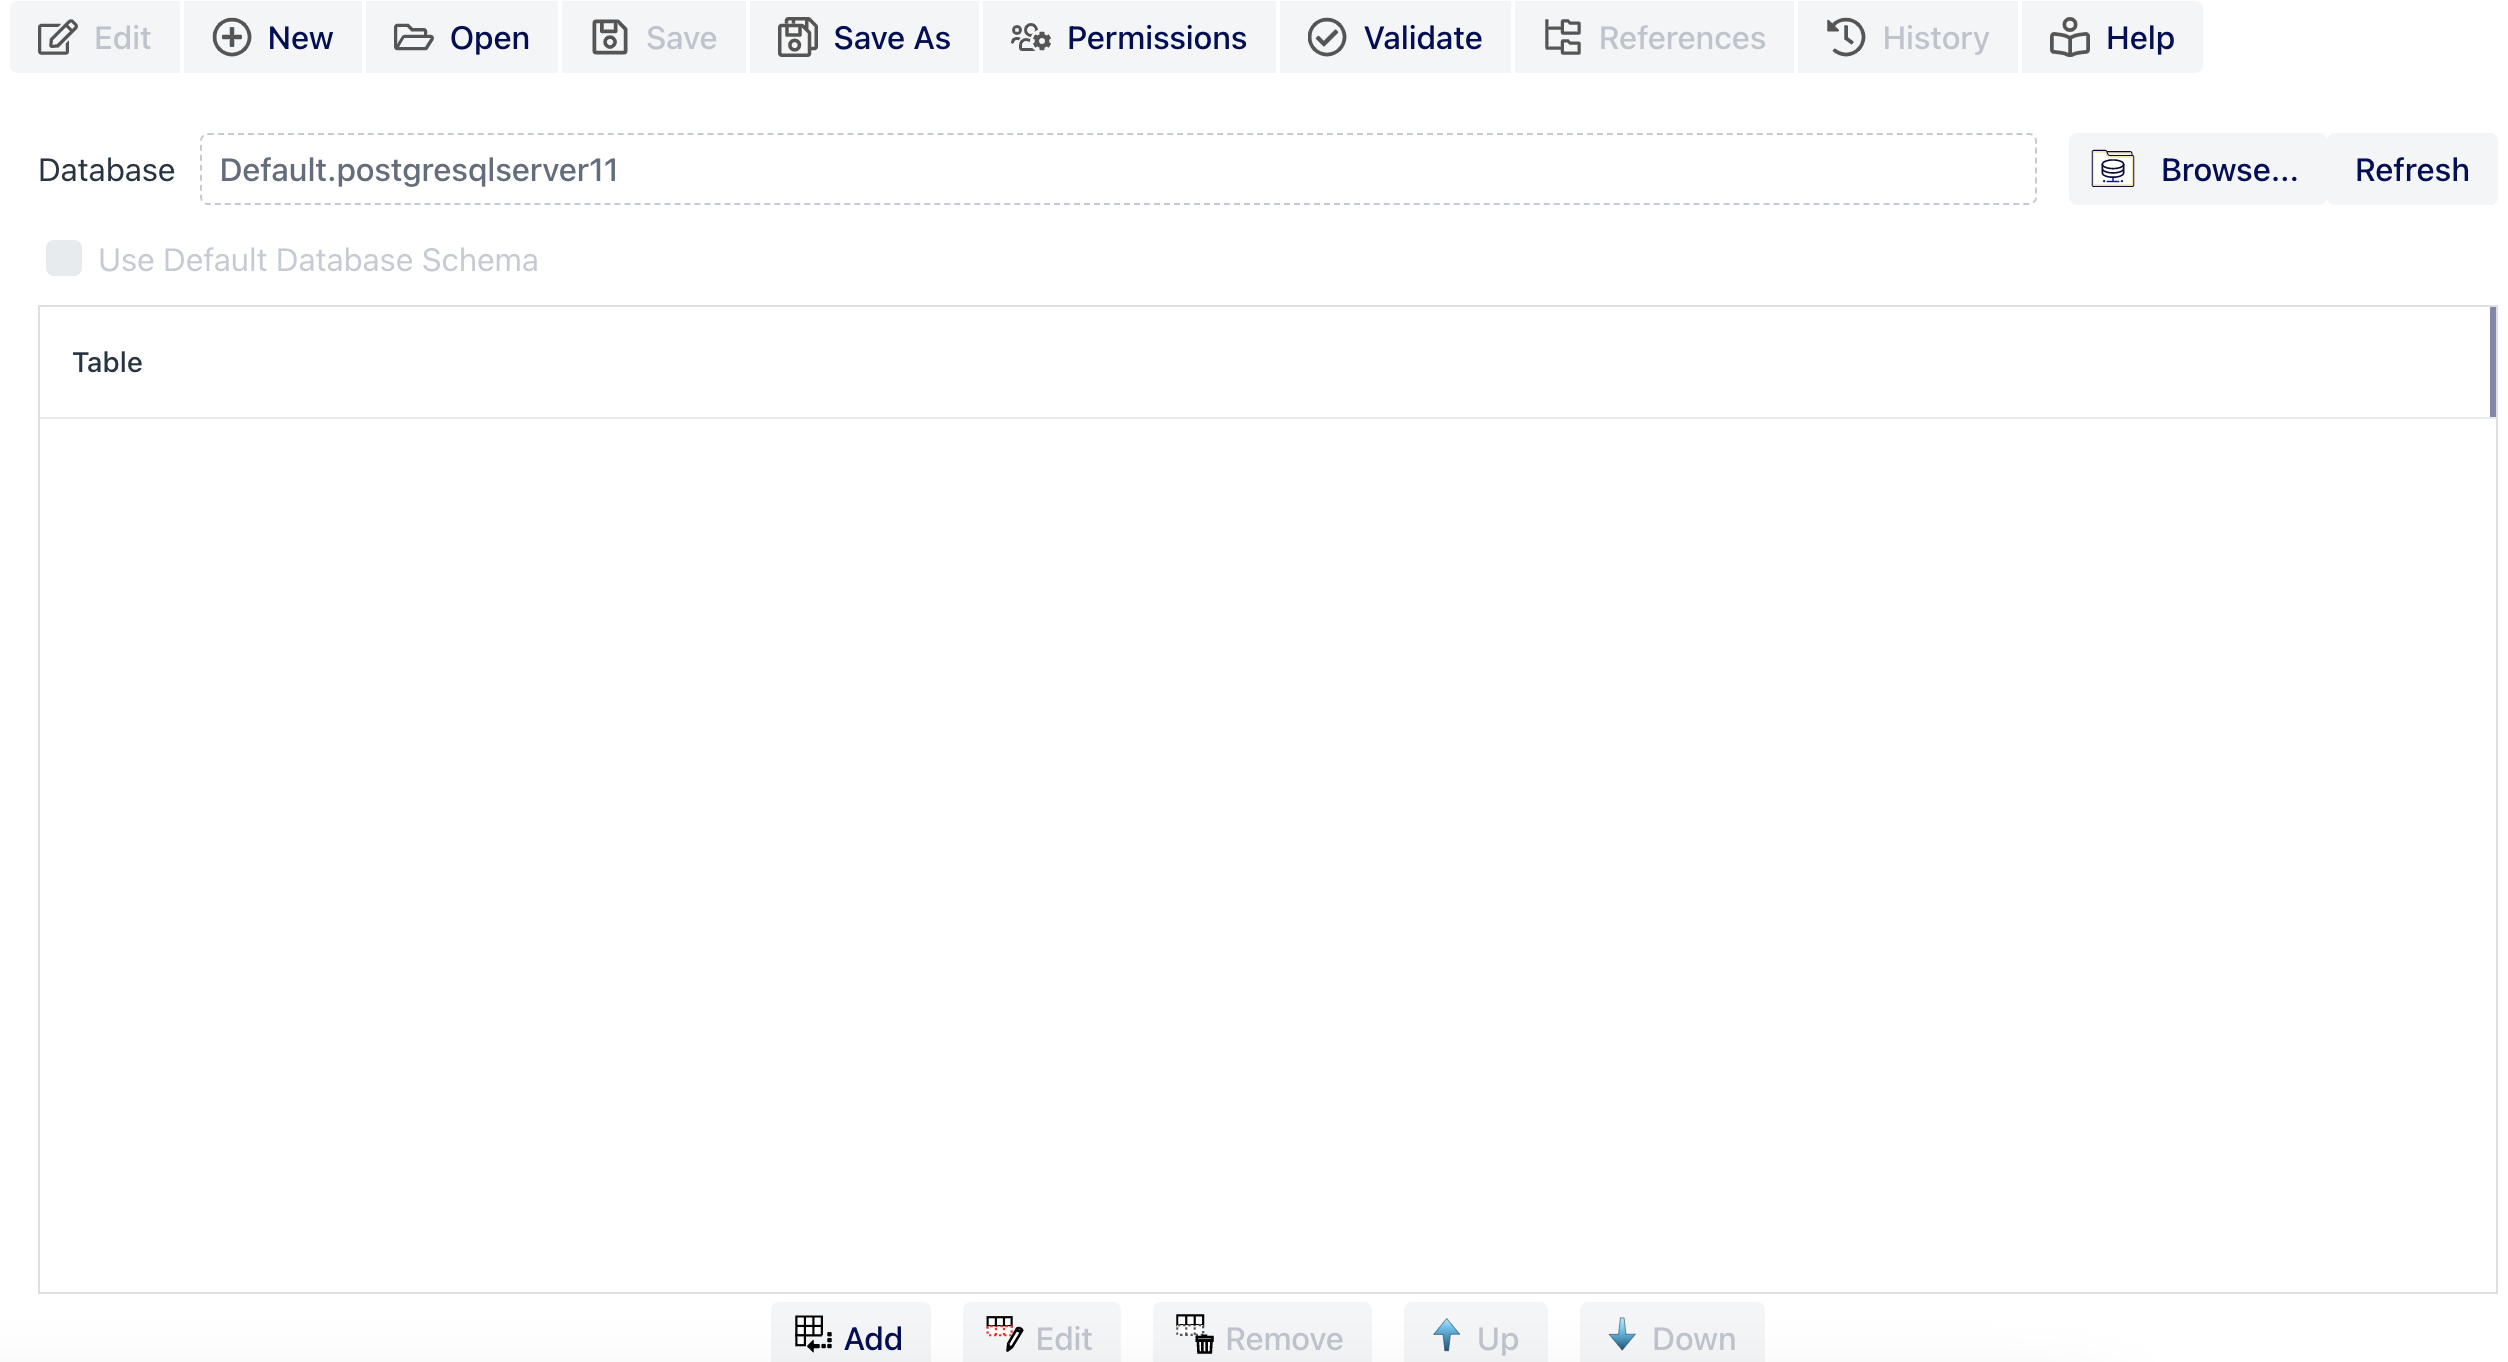
The Audit profile configuration
The contents of the buttons in the button bar may change depending on which configuration type has been opened. The Audit Profile uses the standard menu items and buttons that are visible for all configurations, and these are described in Common Configuration Buttons. The profile uses the standard menu items and buttons that are visible for all configurations.
The Audit profile configuration contains the following settings:
| Setting | Description |
|---|---|
Database | This is the database that the agent will connect and send data to. Click the Browse... button to get a list of all the database profiles that are available. For further information see Database Profile. Note! For performance reasons, Audit information is logged directly from an EC to the database. If an external EC is unable to connect to the database, a "Workflow performance warning" is logged in System Log. If this warning appears, the firewall might need to be reconfigured to allow the EC to communicate directly with the database. The Audit functionality is supported for use with the following databases:
|
Refresh | Select Refresh to reload the metadata for the tables residing in the selected database. |
Use Default Database Schema | Check this to use the default database schema that was added in the Usernamefield of the Default Connection Setup in the Database profile configuration. When using the default database schema the names of the audit tables listed in Table will appear without schema prefix. For more details on how to add a default database schema, see Database Profile. Note! This is not applicable for all database types. Use Default Database Schema is only available for selection when accessing Oracle or TimesTen databases. |
Table | A list of selected audit tables. For further information about adding and editing tables, see the section below, Adding and Editing a Table Mapping. |
Adding and Editing a Table Mapping
From the Add and Edit Audit Table Attributes dialogs, the existing table columns are mapped to valid types.
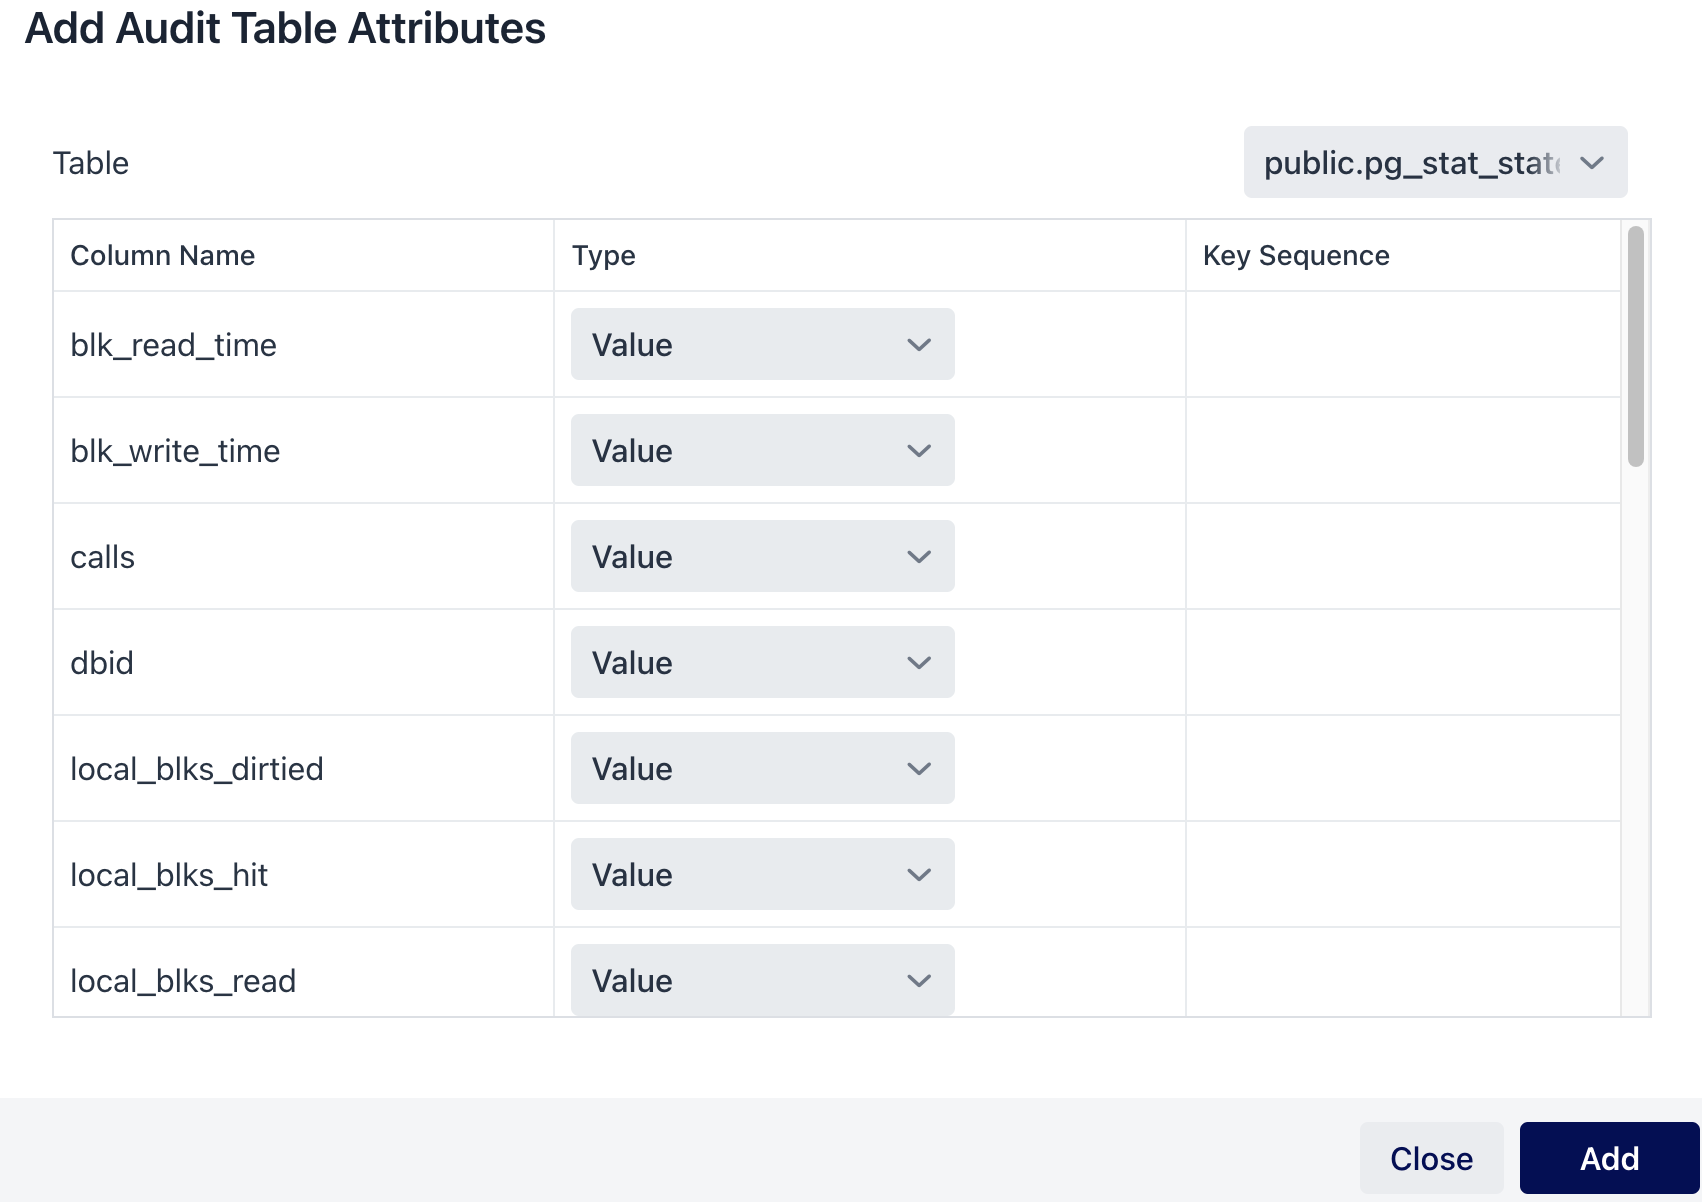
Add Audit Table Attributes
| Setting | Description |
|---|---|
Table | A list from which the audit table is selected. Note! Tables in the System schema will not be available for selection when accessing the Oracle database |
Column Name | The name of the columns in the selected table. |
Type | Clicking the cell, displays a list of valid types. Each column must be mapped against a type. Valid types are:
|
Key Sequence | A key sequence is a defined way to assign a Key value, to identify in which order you need to send along key values when you use the Each key in a table must have a sequence number in order to be identified when passed on as parameters to the APL audit functions. The first key is identified as 1, the second as 2, and so on. The key sequence will uniquely identify all audit log entries to be inserted per batch. |
Audit Profile Example
To illustrate how Audit may be used, consider a workflow with an Analysis agent, validating and routing UDRs. Most of the UDRs will be sent on the "COMPLETE" route. The rest of the incomplete UDRs will be sent on the "PARTIALS" route. If there are a considerable amount UDRs that are routed to the latter, the batch is cancelled.
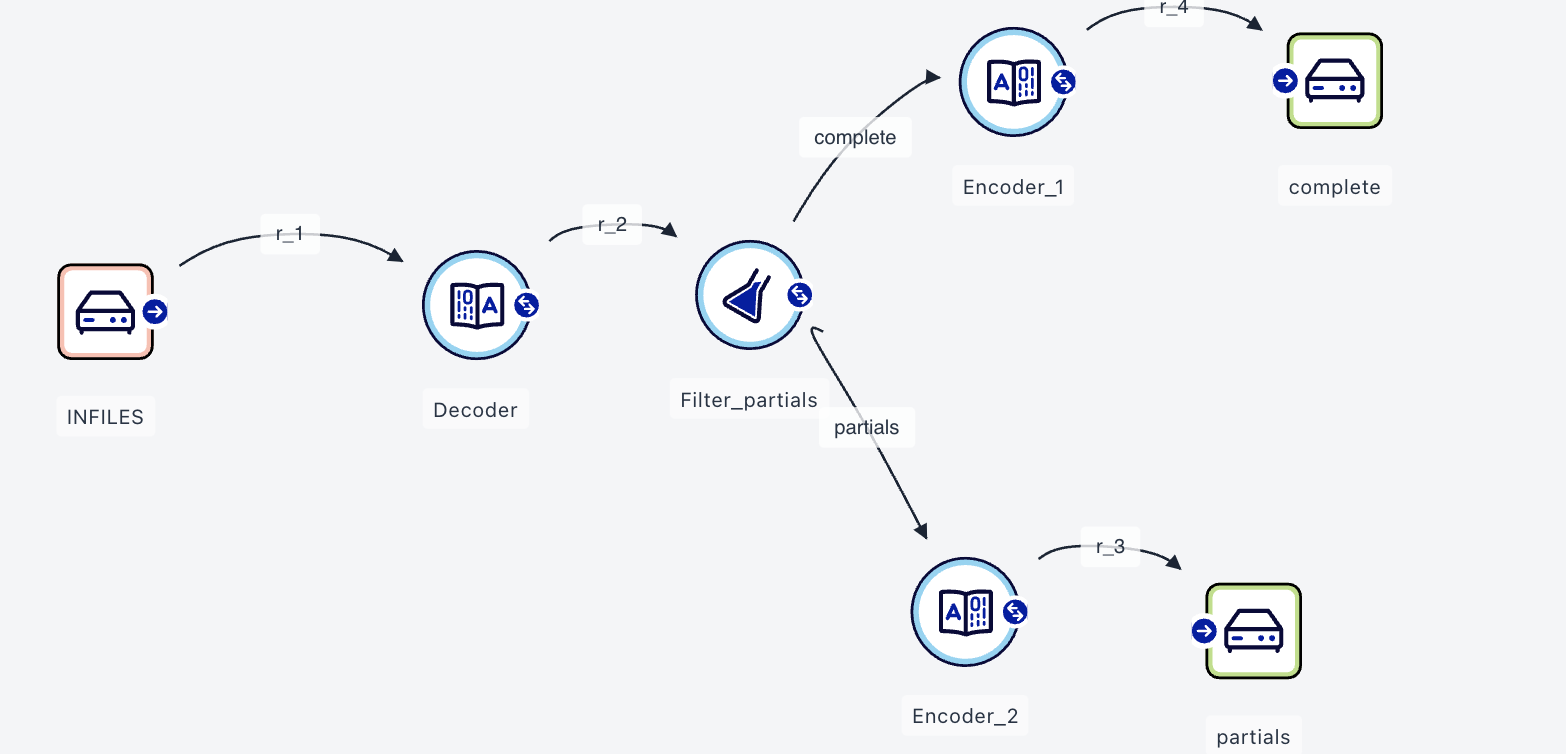
A workflow example
The output on each route is to be logged in an audit table, including information on cancelled batches. An entry in the table is made for each batch and for each route. Hence two entries per batch.
Example audit information
In this example, only the destination key is needed, which uniquely identifies all the rows to be inserted per batch. The name of the destination agent is therefore selected. Note that it is not possible to update an existing row in the table, only to add new rows. This is to ensure the traceability of data. To output information other than MIM values (which may be mapped in the Workflow Properties dialog), the workflow must contain an Analysis or Aggregation agent.
Setting up an Audit profile involves the following steps:
Design the tables:
One column (of type NUMBER) must be reserved for transaction handling. This column should be indexed in order to achieve the best performance. The contents will be of low cardinality and could therefore be compressed if supported.
Consider which column/columns contain tag information, that is, the key. A key may consist of one or several columns.
Create an Audit profile. For further information, see the section below, Adding the Table Mapping.
Map parameters in the Workflow Preferences Audit tab to the Audit profile. For further information, see the section below, Workflow Properties - Audit Tab.
Design APL code to populate the tables. For further information, see the section below, Populating Audit Tables.
Audit Profile
In the Audit profile configuration, the column types are configured. To create a new Audit profile configuration, click New Configuration and select Audit Profile from the menu. Click Browse to select the database in which the table(s) reside, then click OK.
Adding the Table Mapping
Click Add or Edit to open the Add Audit Table Attributes and Edit Audit Table Attributes dialogs, respectively. This is where the existing table columns are mapped to valid types.
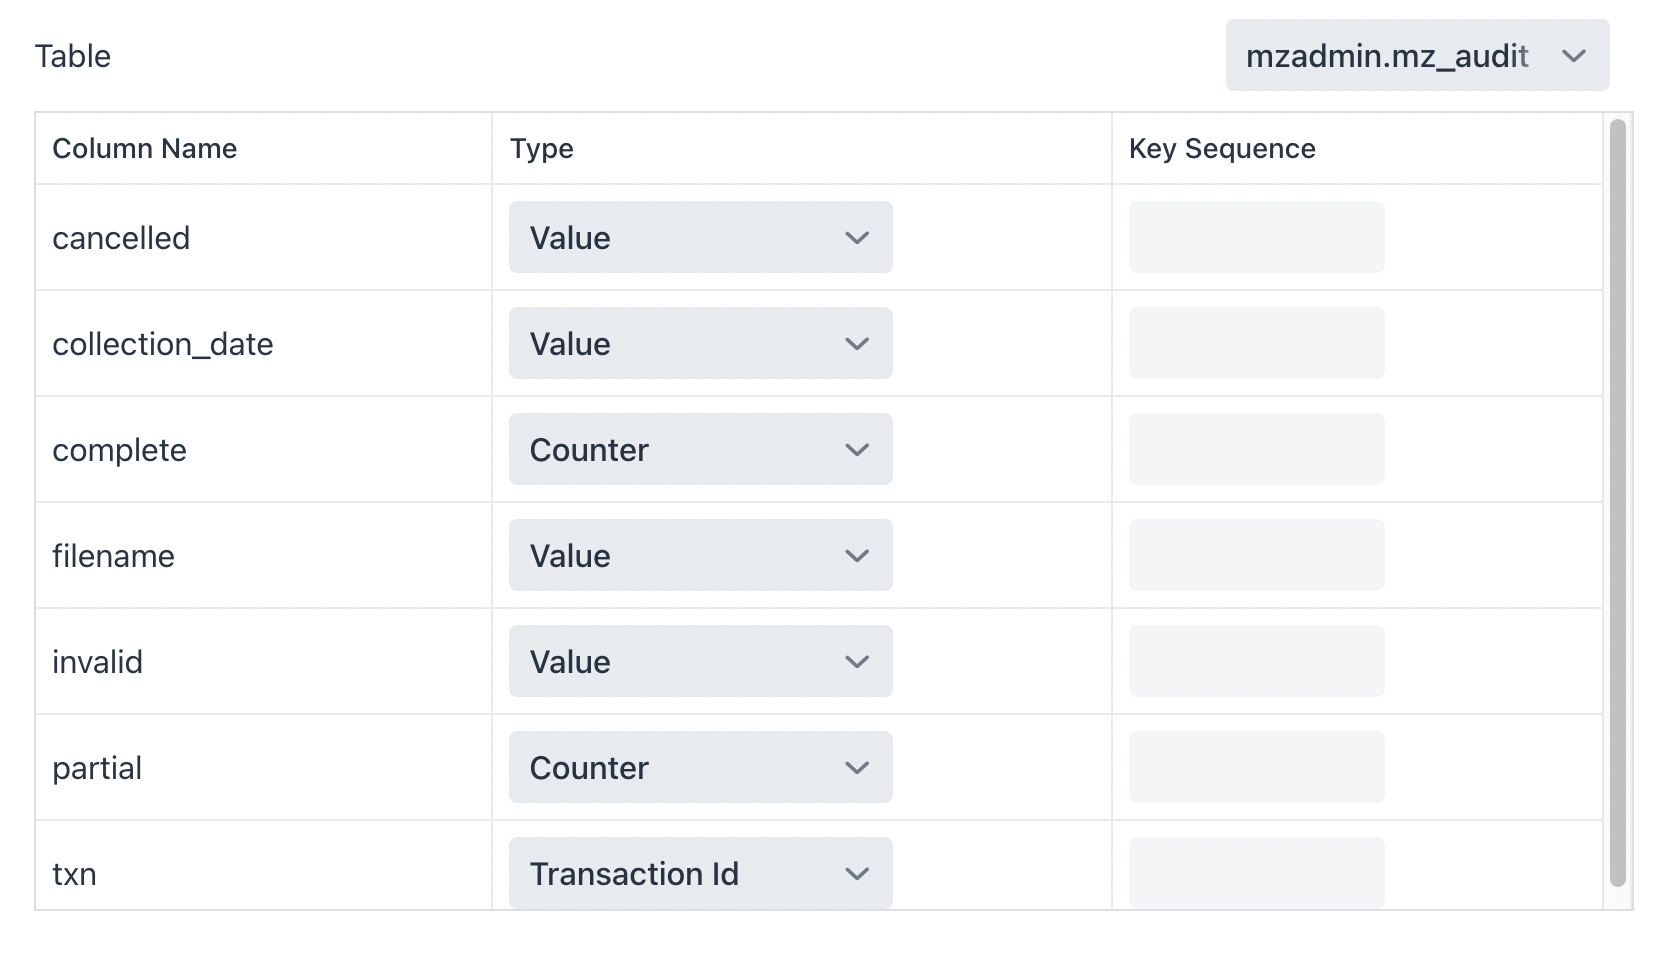
The Audit profile Add Audit Table Attributes dialog or Edit Audit Table Attributes dialog
The data to insert, is put in the UDRs column. Setting it to type Counter, makes it possible to use the auditAdd function to increment the corresponding column value. If Value is used, the auditSet function can be used to assign a value.
Workflow Properties - Audit Tab
The Audit tab in the Workflow Properties dialog defines the type of data entered in the table by the workflow, such as MIM types or anything sent on with the APL audit functions.
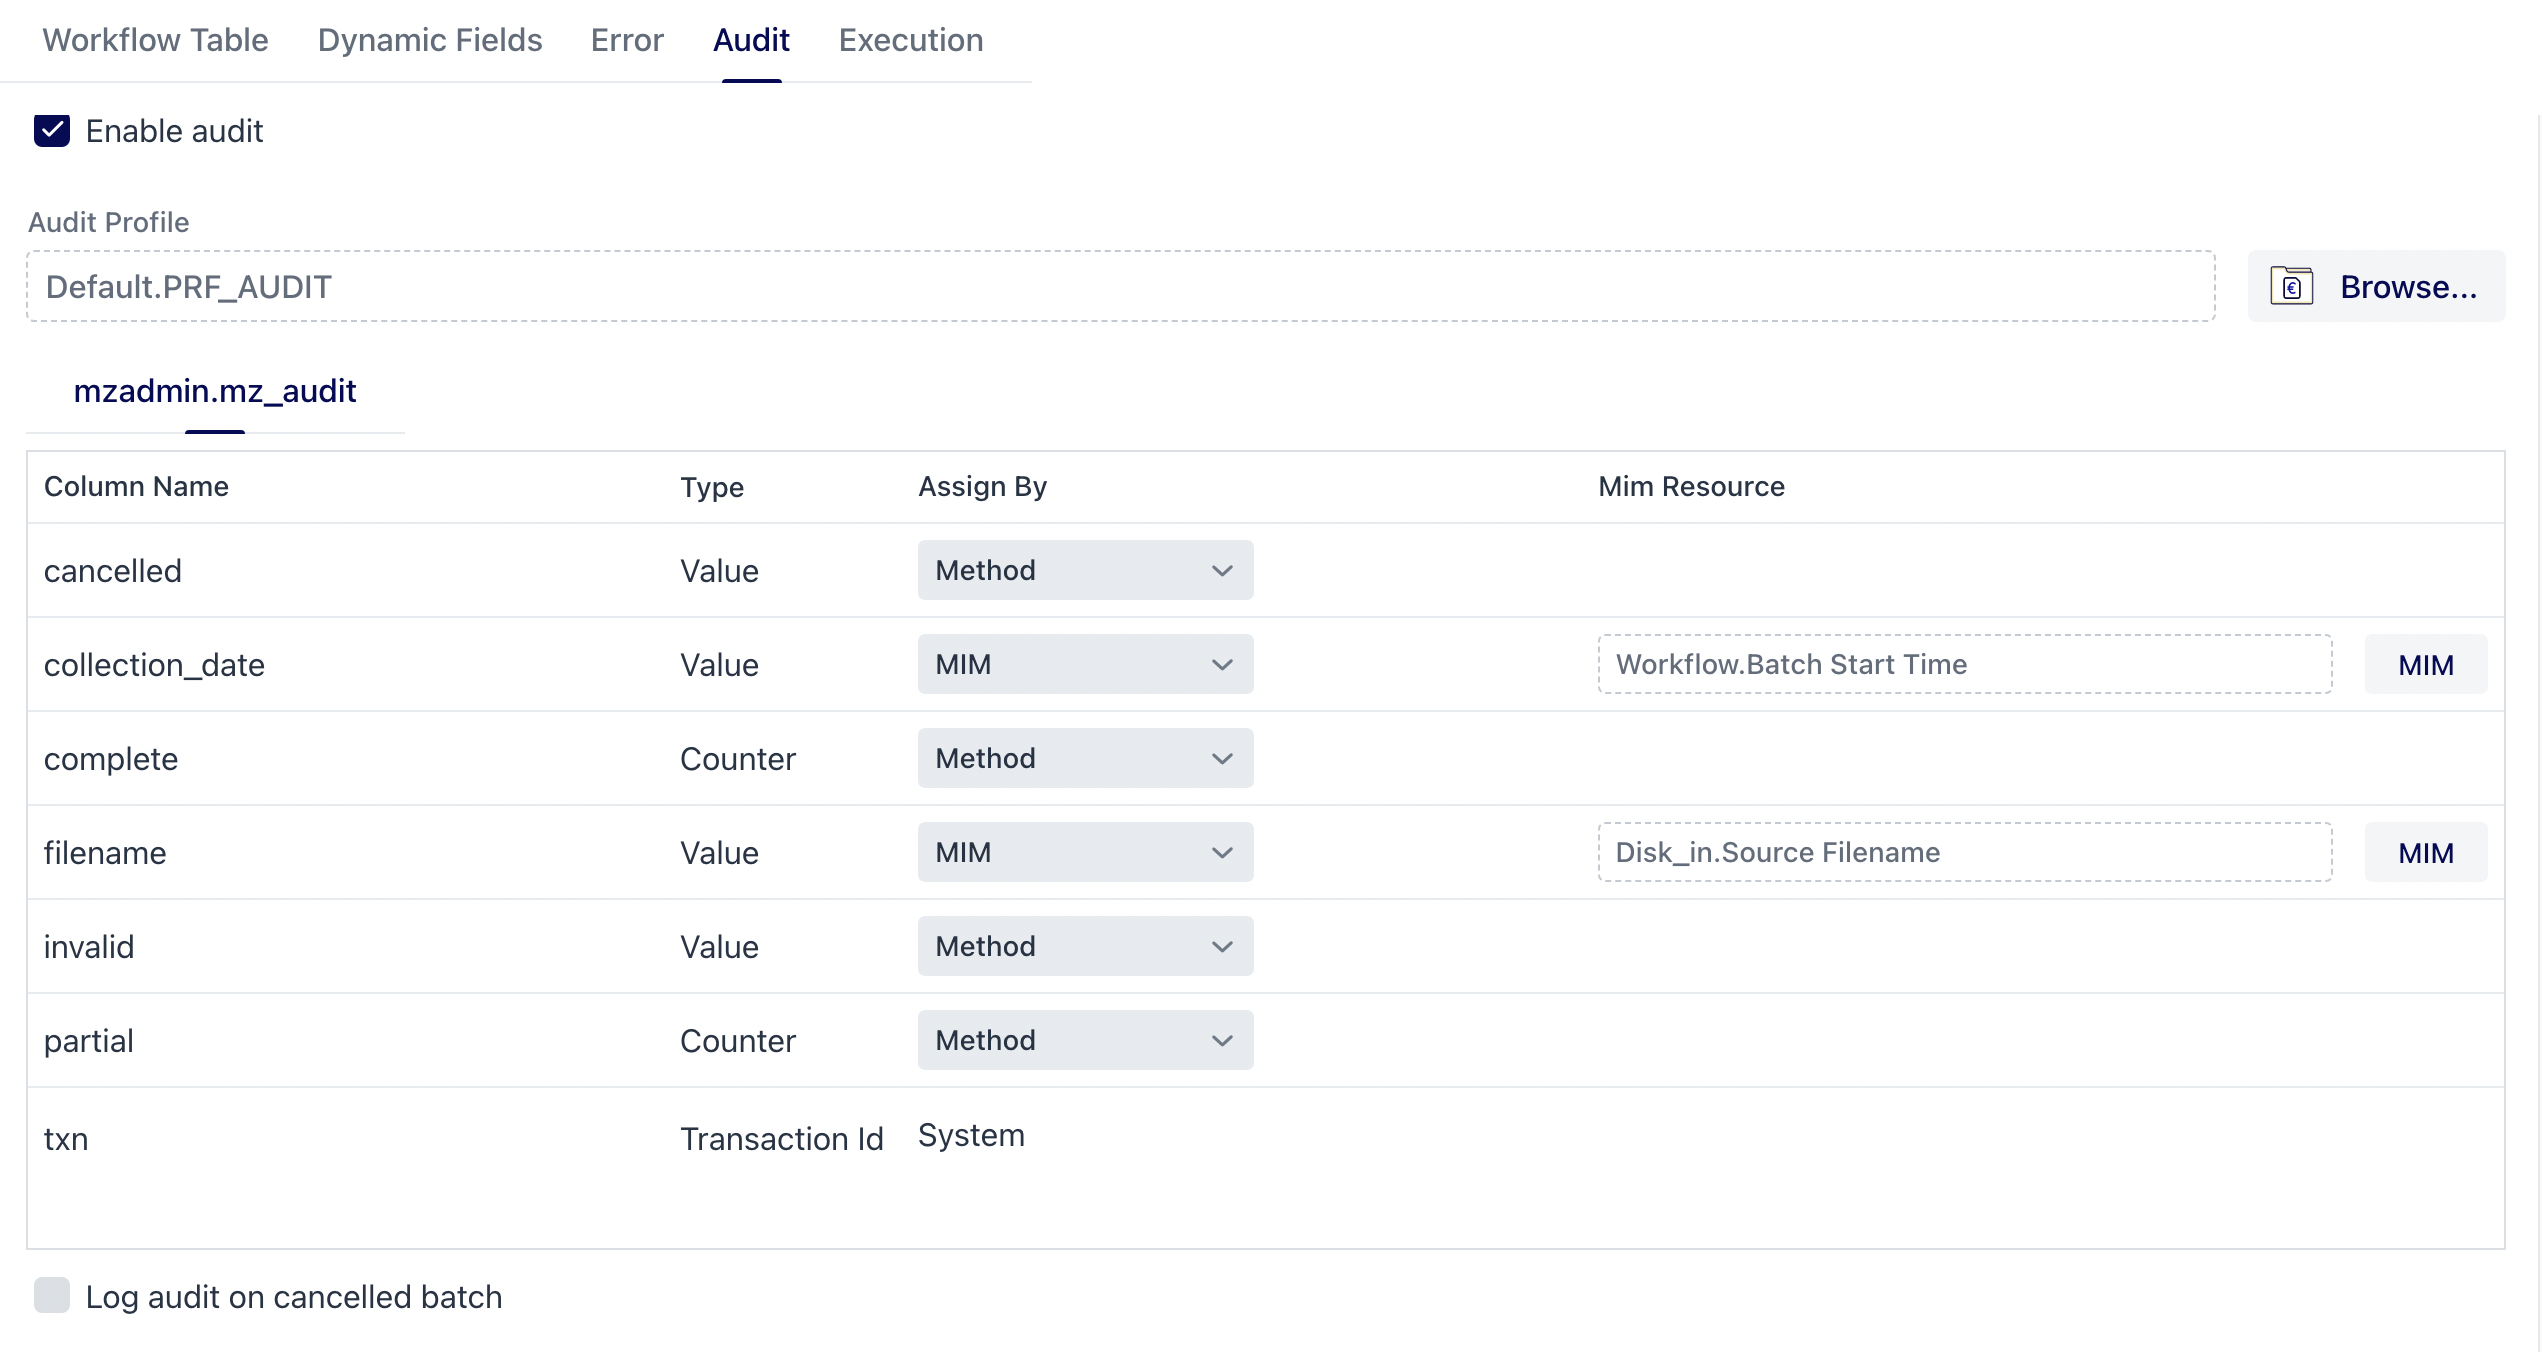
Workflow Properties - The Audit tab
The complete, invalid and partial Column Names in the the Audit table are populated by using the APL audit functions, while collection_date and filename are populated by the workflow MIM values. The cancelled Column Name can be mapped directly to an existing MIM value or populated by the APL audit functions using the Analysis Agent.
Populating Audit Tables
There are two ways of populating audit tables; either by using the auditAdd function, which automatically increments the value of Counter columns, or by setting fixed values to columns of type Value with the auditSet function. Note that Counter columns are automatically set to 0 (zero) when a batch is cancelled. This is not the case for Value columns.
Note!
In terms of performance, it does not matter how many times an audit function is called. Each call is saved in memory and a summary for each key is committed at End Batch.
Counter Increment
By using the auditAdd function, the user does not have to keep track of the number to increment a counter column with. At Cancel Batch, the value is set to 0 (zero).
Fixed Values
Using the auditSet function for the same example as discussed in the previous section, means the user has to keep track of the number of records in the APL code. Note that the profile must be updated; the Counter column must be redefined to Value.
Value columns are not reset when a batch is canceled. Hence there are entries made in the table for the UDRs column for all batches.
Example - Use of auditAdd and auditSet
In this example code, each UDR is validated with respect to the contents of the causeForOutput field. The audit table is updated to hold information on the numbers of complete, partial, and invalid UDRs sent on the routes.
// Define counters
int complete = 0;
int partials = 0;
int invalid = 0;

//Publish a new MIM
mimPublish(trailer, "My Trailer",string);

consume {
    // Check if the UDR is of type complete
    if(input.causeForOutput == 0){
        // Increment complete counter
        complete = complete + 1;
        // Increment value of column COMPLETE
        auditAdd( "Default.PRF_AUDIT","MZADMIN.MZ_AUDIT","COMPLETE",1 );
        // Route UDR on outgoing route "COMPLETE"
        udrRoute(input, "COMPLETE");
    }
    // Check if the UDR is of type partial
    else if(input.causeForOutput == 1 ||input.causeForOutput == 2){
        // Increment partial counter
        partials = partials + 1;
        // Increment value of column PARTIAL
        auditAdd( "Default.PRF_AUDIT","MZADMIN.MZ_AUDIT","PARTIAL",1 );
        // Route UDR on outgoing route "PARTIALS"
        udrRoute(input, "PARTIALS");
    }
    else{
        // Increment invalid counter
        invalid = invalid + 1;
        // Set the value of column INVALID
        auditSet( "Default.PRF_AUDIT","MZADMIN.MZ_AUDIT","INVALID",invalid );
    }

}